


English
Today, Iwill teach you how to use TensorArt to train an Hunyuan model online.
When you have finished reading this tutorial and have trained a model, you can test the best raw image Step and CFG of your trained model in this workflow.👉https://tensor.art/workflows/877479664430371272
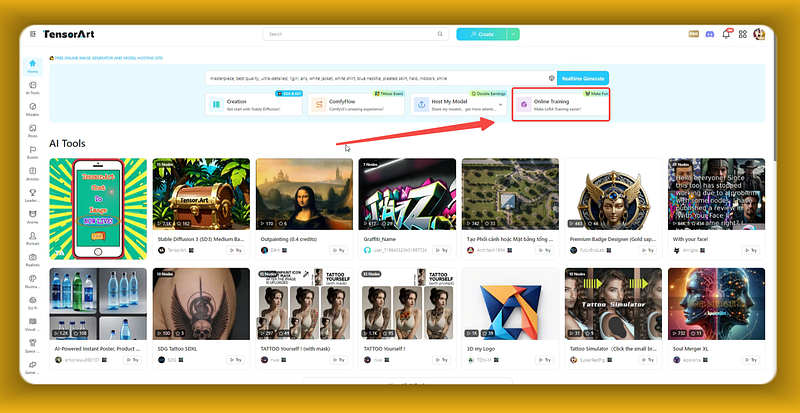
Step 1: Open “Online Training.
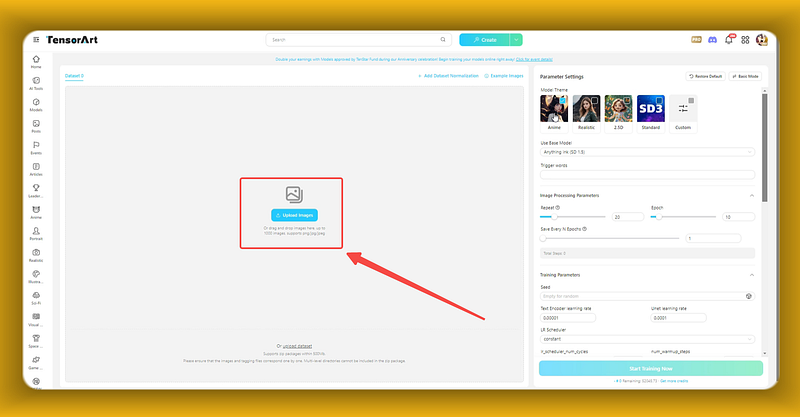
On the left side, you will see the dataset window, which is empty by default. You can upload some images to create a dataset or upload a dataset zip file. The zip file can include annotation files, following the same format as kohya-ss, where each image file corresponds to a text annotation file with the same name.
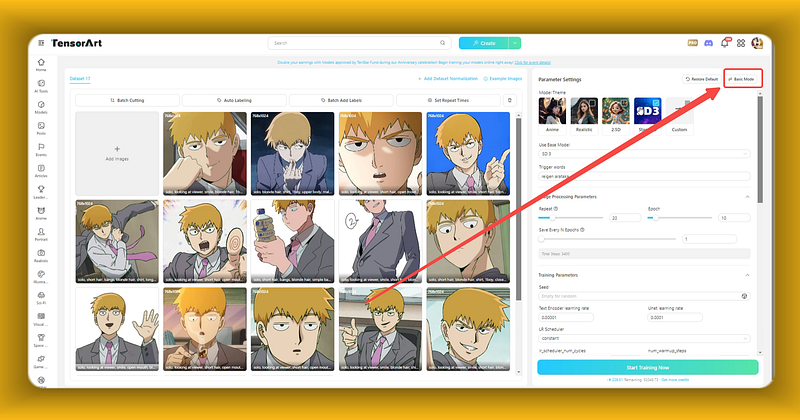
In the model theme section on the right, you can choose from options such as anime characters, real people, 2.5D, standard, and custom.
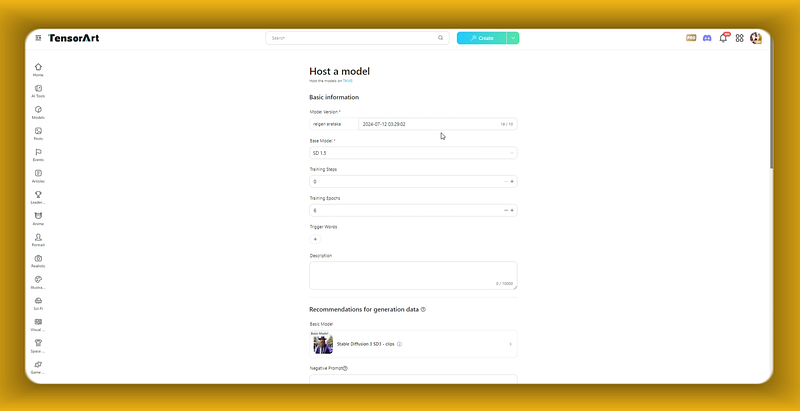
Here, we select “Base” and choose the Hunyuan model as the base model.
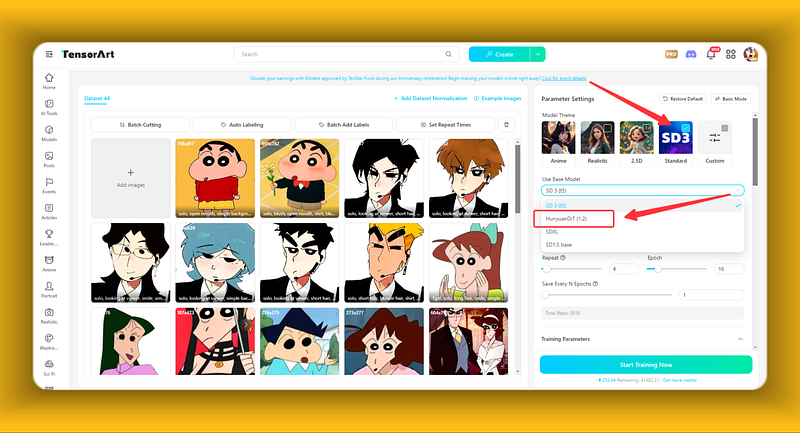
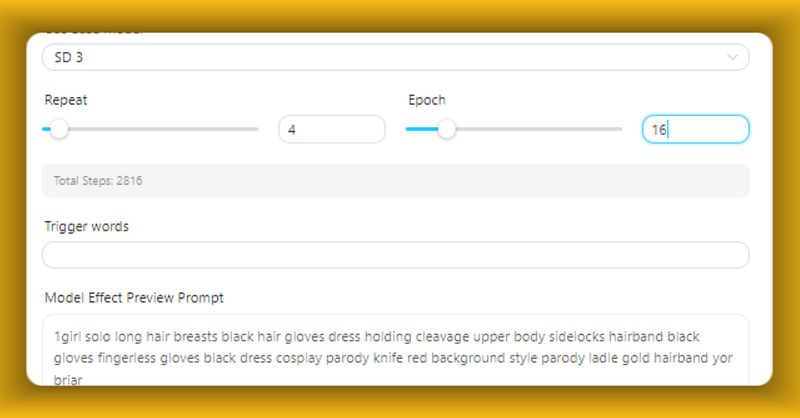
For the base model parameter settings, we recommend setting the number of repetitions per image to 4 and the number of epochs to 16.、
After uploading a processed dataset, if your dataset annotations include character names, you don’t need to specify a trigger word. Otherwise, you should assign a simple trigger word to your model, such as a character name or style name.
Next, select an annotation file from the dataset to use as a preview prompt.
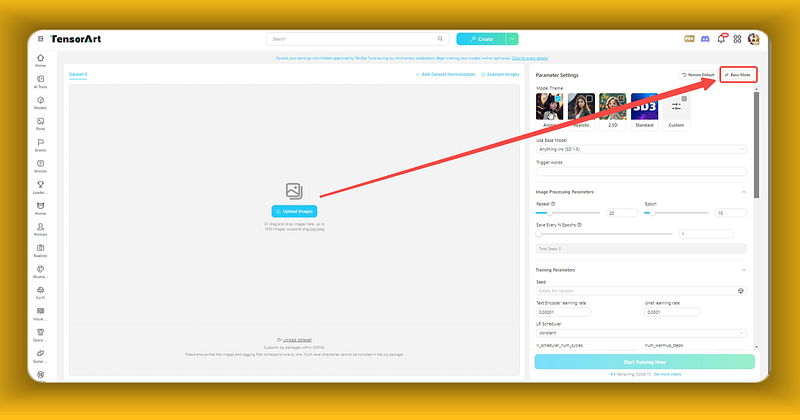
If you want to use Professional Mode, click the button in the top right corner to switch to Professional Mode.
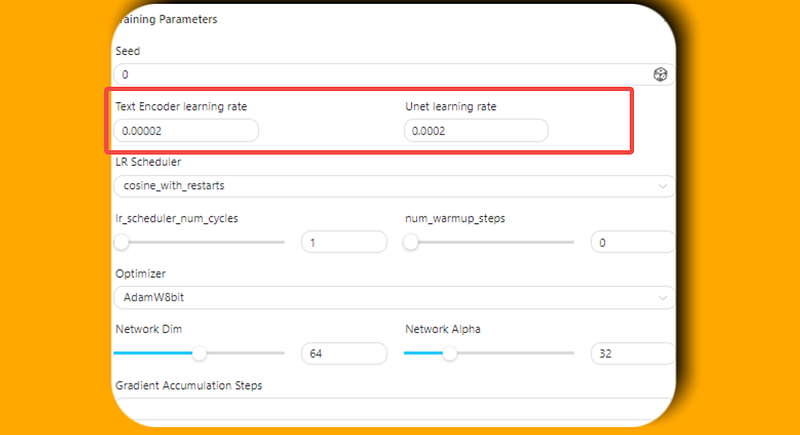
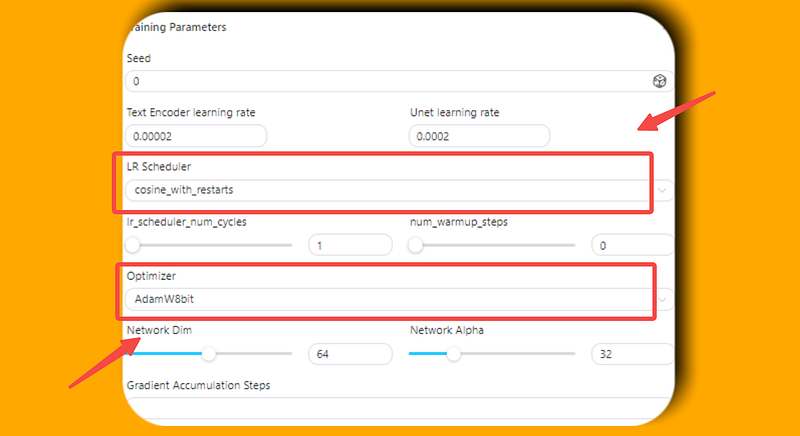
In Professional Mode, it is recommended to double the learning rate
and use the cosine_with_restarts learning rate scheduler. For the optimizer, you can choose AdamW8bit.
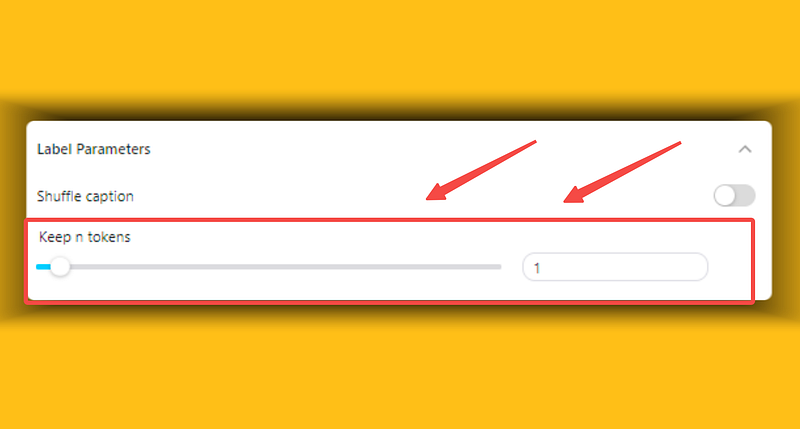
Enable label shuffling and ensure that the first token remains unchanged (especially if you have a character name trigger word as the first token).
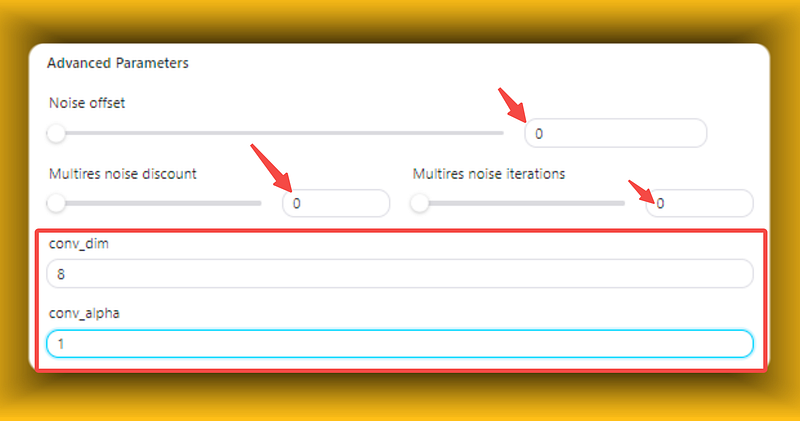
Disable the noise offset feature, and you can set the convolution DIM to 8 and Alpha to 1.
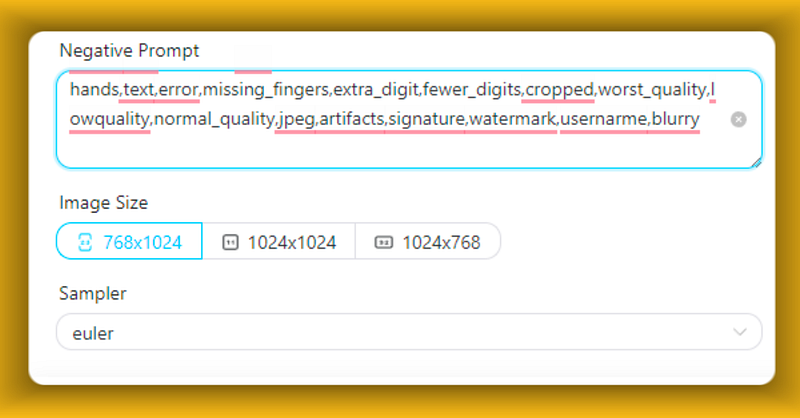
In the sample settings, add the Negative prompts, and then you can start the training process.
In the training queue, you can view the current loss value chart and the four sample images generated for each epoch.
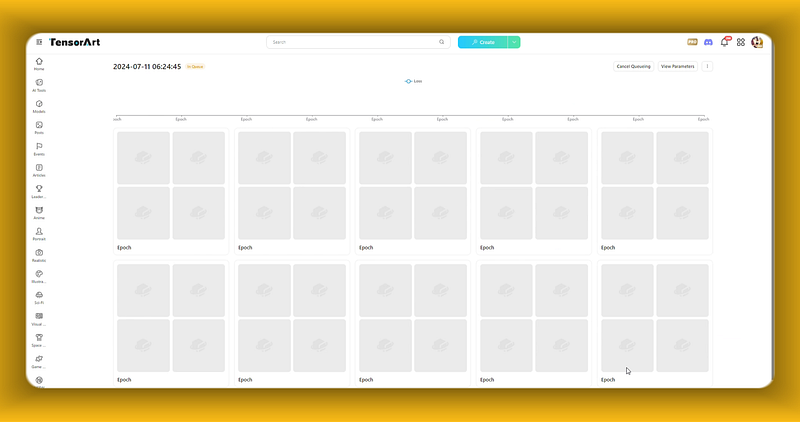

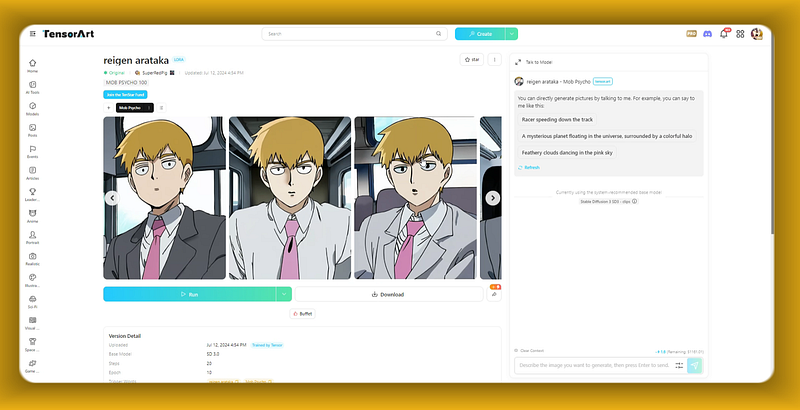
Finally, you can choose the epoch with the best results to download to your local machine or publish directly on TensorArt.
After a few minutes, your model will be deployed and ready.
日本語
今日、私はTensorArtを使用してHunyuanモデルをオンラインでトレーニングする方法を教えます。
ステップ1: 「オンライントレーニング」を開きます。
左側にデータセットウィンドウが表示され、デフォルトでは空です。データセットを作成するために画像をアップロードするか、データセットのzipファイルをアップロードできます。zipファイルには、kohya-ssと同じ形式のアノテーションファイルを含めることができ、各画像ファイルには同じ名前のテキストアノテーションファイルが対応しています。
右側のモデルテーマセクションでは、アニメキャラクター、実在の人物、2.5D、標準、カスタムなどのオプションから選択できます。
ここでは「Base」を選択し、Hunyuanモデルをベースモデルとして選びます。
ベースモデルのパラメーター設定では、画像ごとの繰り返し回数を4、エポック数を16に設定することをお勧めします。 処理済みのデータセットをアップロードした後、データセットのアノテーションにキャラクター名が含まれている場合は、トリガーワードを指定する必要はありません。それ以外の場合は、キャラクター名やスタイル名など、モデルに簡単なトリガーワードを割り当ててください。 次に、プレビュー用プロンプトとして使用するために、データセットからアノテーションファイルを選択します。
プロフェッショナルモードを使用したい場合は、右上隅のボタンをクリックしてプロフェッショナルモードに切り替えます。
プロフェッショナルモードでは、学習率を倍増することをお勧めします。
また、cosine_with_restarts学習率スケジューラーを使用してください。オプティマイザーとしては、AdamW8bitを選択できます。
ラベルシャッフルを有効にし、最初のトークンが変更されないようにします(特にキャラクター名トリガーワードが最初のトークンの場合)。
ノイズオフセット機能を無効にし、畳み込みDIMを8、Alphaを1に設定できます。
サンプル設定でNegative promptsを追加し、その後、トレーニングプロセスを開始できます。
トレーニングキューでは、現在の損失値チャートと各エポックごとに生成された4つのサンプル画像を表示できます。
最後に、最良の結果が得られたエポックを選択して、ローカルマシンにダウンロードするか、直接TensorArtで公開できます。
数分後には、モデルがデプロイされ、使用可能になります。
한국인
오늘은 TensorArt를 사용하여 Hunyuan 모델을 온라인에서 훈련하는 방법을 알려드리겠습니다.
1단계: “온라인 훈련”을 엽니다.
왼쪽에는 기본적으로 비어 있는 데이터셋 창이 표시됩니다. 데이터셋을 만들기 위해 이미지를 업로드하거나 데이터셋 zip 파일을 업로드할 수 있습니다. zip 파일에는 kohya-ss와 같은 형식의 주석 파일이 포함될 수 있으며, 각 이미지 파일에는 동일한 이름의 텍스트 주석 파일이 대응됩니다.
오른쪽의 모델 테마 섹션에서는 애니메이션 캐릭터, 실제 인물, 2.5D, 표준, 사용자 정의 등 다양한 옵션 중에서 선택할 수 있습니다.
여기에서는 “Base”를 선택하고 Hunyuan 모델을 기본 모델로 선택합니다.
기본 모델 파라미터 설정에서는 이미지당 반복 횟수를 4로, 에포크 수를 16으로 설정하는 것을 권장합니다. 처리된 데이터셋을 업로드한 후, 데이터셋의 주석에 캐릭터 이름이 포함되어 있으면 트리거 단어를 지정할 필요가 없습니다. 그렇지 않으면 모델에 간단한 트리거 단어를 지정해야 합니다, 예를 들어 캐릭터 이름이나 스타일 이름 등. 다음으로, 미리 보기 프롬프트로 사용할 주석 파일을 데이터셋에서 선택합니다.
전문 모드를 사용하려면, 오른쪽 상단의 버튼을 클릭하여 전문 모드로 전환합니다.
전문 모드에서는 학습률을 두 배로 늘리는 것이 좋습니다.
또한 cosine_with_restarts 학습률 스케줄러를 사용합니다. 옵티마이저로는 AdamW8bit을 선택할 수 있습니다.
레이블 셔플을 활성화하고 첫 번째 토큰이 변경되지 않도록 합니다(특히 캐릭터 이름 트리거 단어가 첫 번째 토큰인 경우).
노이즈 오프셋 기능을 비활성화하고, 컨볼루션 DIM을 8로, Alpha를 1로 설정할 수 있습니다.
샘플 설정에서 Negative prompts를 추가한 후, 훈련 프로세스를 시작할 수 있습니다.
훈련 대기열에서 현재 손실 값 차트와 각 에포크에 대해 생성된 4개의 샘플 이미지를 볼 수 있습니다.
마지막으로, 가장 좋은 결과를 얻은 에포크를 선택하여 로컬 컴퓨터로 다운로드하거나 직접 TensorArt에 게시할 수 있습니다.
몇 분 후, 모델이 배포되고 사용 가능해집니다.
Tiếng Việt
Hôm nay, tôi sẽ hướng dẫn bạn cách sử dụng TensorArt để đào tạo mô hình Hunyuan trực tuyến.
Bước 1: Mở “Đào tạo trực tuyến.”
Ở bên trái, bạn sẽ thấy cửa sổ tập dữ liệu, mặc định là trống. Bạn có thể tải lên một số hình ảnh để tạo tập dữ liệu hoặc tải lên tệp zip của tập dữ liệu. Tệp zip có thể bao gồm các tệp chú thích, theo cùng một định dạng như kohya-ss, trong đó mỗi tệp hình ảnh tương ứng với một tệp chú thích văn bản cùng tên.
Ở phần chủ đề mô hình bên phải, bạn có thể chọn từ các tùy chọn như nhân vật anime, người thật, 2.5D, tiêu chuẩn và tùy chỉnh.
Tại đây, chúng ta chọn “Base” và chọn mô hình Hunyuan làm mô hình cơ bản.
Đối với cài đặt tham số của mô hình cơ bản, chúng tôi khuyên bạn nên đặt số lần lặp lại trên mỗi hình ảnh là 4 và số epoch là 16. Sau khi tải lên tập dữ liệu đã xử lý, nếu các chú thích của tập dữ liệu của bạn bao gồm tên nhân vật, bạn không cần phải chỉ định từ kích hoạt. Ngược lại, bạn nên gán một từ kích hoạt đơn giản cho mô hình của mình, chẳng hạn như tên nhân vật hoặc tên phong cách. Tiếp theo, chọn một tệp chú thích từ tập dữ liệu để sử dụng làm lời nhắc xem trước.
Nếu bạn muốn sử dụng Chế độ Chuyên nghiệp, hãy nhấp vào nút ở góc trên bên phải để chuyển sang Chế độ Chuyên nghiệp.
Trong Chế độ Chuyên nghiệp, nên gấp đôi tỷ lệ học.
Và sử dụng bộ lập lịch tỷ lệ học cosine_with_restarts. Đối với bộ tối ưu hóa, bạn có thể chọn AdamW8bit.
Kích hoạt xáo trộn nhãn và đảm bảo rằng mã thông báo đầu tiên không thay đổi (đặc biệt nếu bạn có từ kích hoạt tên nhân vật là mã thông báo đầu tiên).
Tắt tính năng dịch chuyển tiếng ồn và bạn có thể đặt DIM tích chập là 8 và Alpha là 1.
Trong cài đặt mẫu, thêm các Lời nhắc tiêu cực, sau đó bạn có thể bắt đầu quá trình đào tạo.
Trong hàng đợi đào tạo, bạn có thể xem biểu đồ giá trị tổn thất hiện tại và bốn hình ảnh mẫu được tạo ra cho mỗi epoch.
Cuối cùng, bạn có thể chọn epoch có kết quả tốt nhất để tải xuống máy tính của bạn hoặc xuất bản trực tiếp trên TensorArt.
Sau vài phút, mô hình của bạn sẽ được triển khai và sẵn sàng sử dụng.
español
Hoy, te enseñaré cómo usar TensorArt para entrenar un modelo Hunyuan en línea.
Paso 1: Abre “Entrenamiento en línea.”
A la izquierda, verás la ventana del conjunto de datos, que está vacía por defecto. Puedes subir algunas imágenes para crear un conjunto de datos o subir un archivo zip del conjunto de datos. El archivo zip puede incluir archivos de anotación, siguiendo el mismo formato que kohya-ss, donde cada archivo de imagen corresponde a un archivo de anotación de texto con el mismo nombre.
En la sección de temas del modelo a la derecha, puedes elegir entre opciones como personajes de anime, personas reales, 2.5D, estándar y personalizado.
Aquí, seleccionamos “Base” y elegimos el modelo Hunyuan como el modelo base.
Para la configuración de parámetros del modelo base, te recomendamos configurar el número de repeticiones por imagen a 4 y el número de épocas a 16. Después de subir un conjunto de datos procesado, si las anotaciones de tu conjunto de datos incluyen nombres de personajes, no necesitas especificar una palabra de activación. De lo contrario, deberías asignar una palabra de activación simple a tu modelo, como un nombre de personaje o un nombre de estilo. A continuación, selecciona un archivo de anotación del conjunto de datos para usarlo como un aviso de vista previa.
Si deseas usar el Modo Profesional, haz clic en el botón en la esquina superior derecha para cambiar al Modo Profesional.
En el Modo Profesional, se recomienda duplicar la tasa de aprendizaje.
Y usar el programador de tasa de aprendizaje cosine_with_restarts. Para el optimizador, puedes elegir AdamW8bit.
Habilita el barajado de etiquetas y asegúrate de que el primer token permanezca sin cambios (especialmente si tienes una palabra de activación de nombre de personaje como el primer token).
Desactiva la función de desplazamiento de ruido y puedes configurar el DIM de convolución a 8 y Alpha a 1.
En la configuración de muestra, añade los Avisos Negativos, y luego puedes comenzar el proceso de entrenamiento.
En la cola de entrenamiento, puedes ver el gráfico del valor de pérdida actual y las cuatro imágenes de muestra generadas para cada época.
Finalmente, puedes elegir la época con los mejores resultados para descargarla a tu máquina local o publicarla directamente en TensorArt.
Después de unos minutos, tu modelo estará desplegado y listo para usar.